InStitches Creative Textile Courses
  • Home
    • Contact us
    • The Small Print
    • Privacy policy
    • Want to stay locally?
    • COVID-19 information page
    • About us >
      • The story of InStitches
      • How to find us
      • News and events
      • What our students say
      • Gallery
  • Courses & workshops
    • Courses and workshops at a glance
    • Studio Days
    • Year-long courses >
      • Inspiration to Stitch
      • Bringing colour to life
      • Creative Journeys
    • Textile adventures >
      • Guest tutors 2022 >
        • Claire Benn Acrylics with a textile sensibility
        • Judith Needham - weave your own chicken
        • Polly Pollock - Pebbles & nests
        • Debbie Lyddon - stitched collage 2022
        • Cas Holmes - Layers, lines and image
        • Kate Findlay - Wild Garden
        • Christine Chester - Poetry of decay 2022
        • Caroline Bell - introduction to eco printing
        • Polly Pollock - From the sea
        • Claire Benn - Out of this earth
        • Amanda Hislop - Escape into landscape
        • Alice Fox - Natural Structures
        • Polly Pollock - Twined baskets & pods
        • Wendy Dolan - Inspired by India
        • Kate Findlay - Magical lantern
        • Matthew Harris - From parts to a whole
  • Online workshops
    • Online
  • Shop
    • Workshop Gift Vouchers
  • Blog
    • On our travels

Travelling for Inspiration

28/3/2019

0 Comments

 
If you follow us on Instagram or Facebook you’d be forgiven for wondering what on earth has been going on recently. There’s been posts from both Iceland and Jordan, from snow and frozen waterfalls to desert sands and floating in The Dead Sea plus no blogs for the last couple of weeks.

Long story short: we’ve been on holiday!
Picture
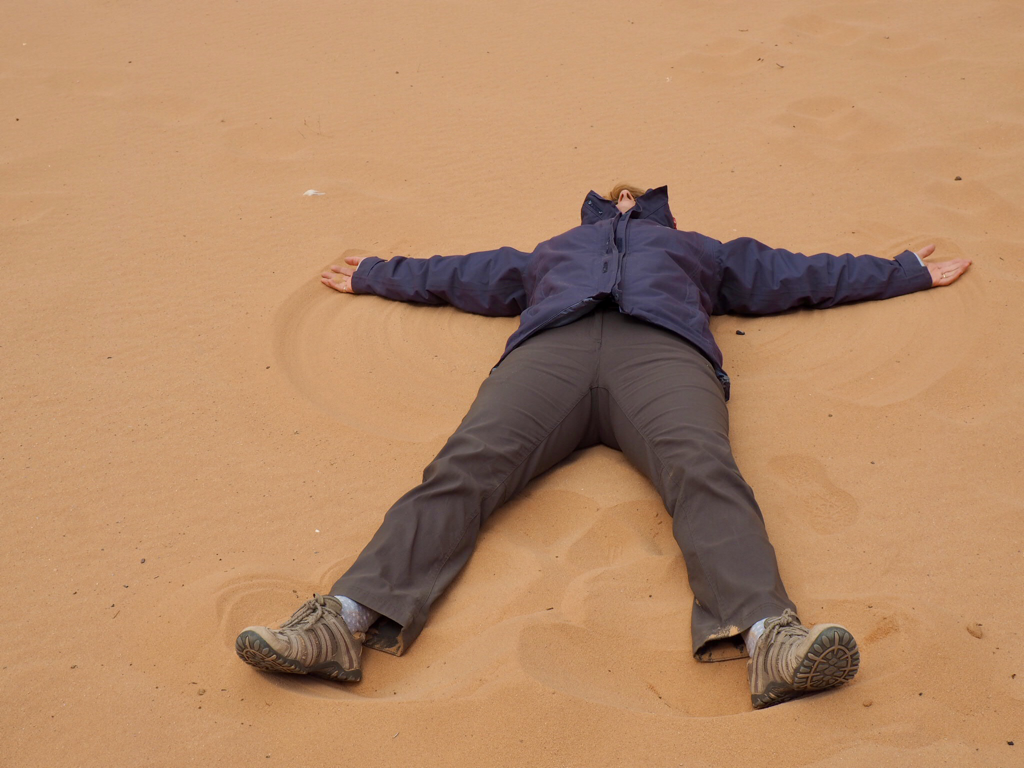
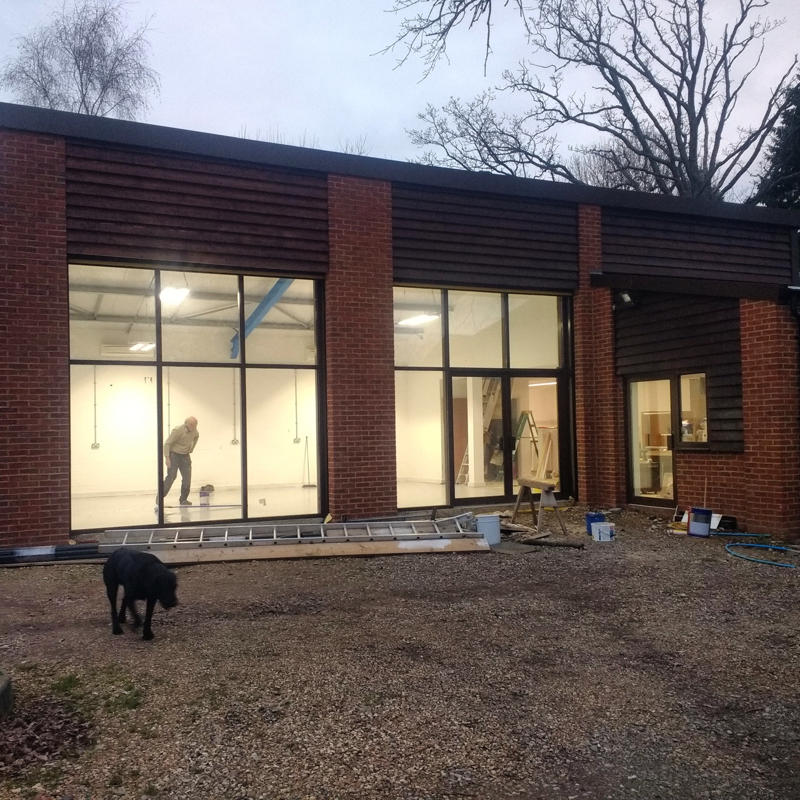
After a very frantic start to the new year with moving studio, teaching etc we decided that it was time for a bit of rest and recouperation! Terry went off to Iceland and I chose to cycle through Jordan.

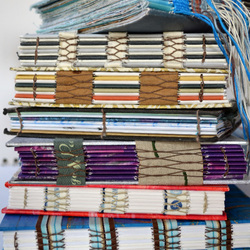
Wherever we go the textile artist in us isn’t far behind.... This week you are being treated to some of my photographs from Petra and next time it’ll be Terry’s from Iceland.

So go make a coffee, sit back and enjoy!

Picture
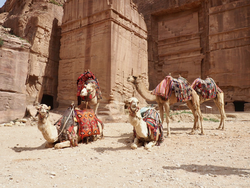
Camels may have a reputation for being a bit grumpy,

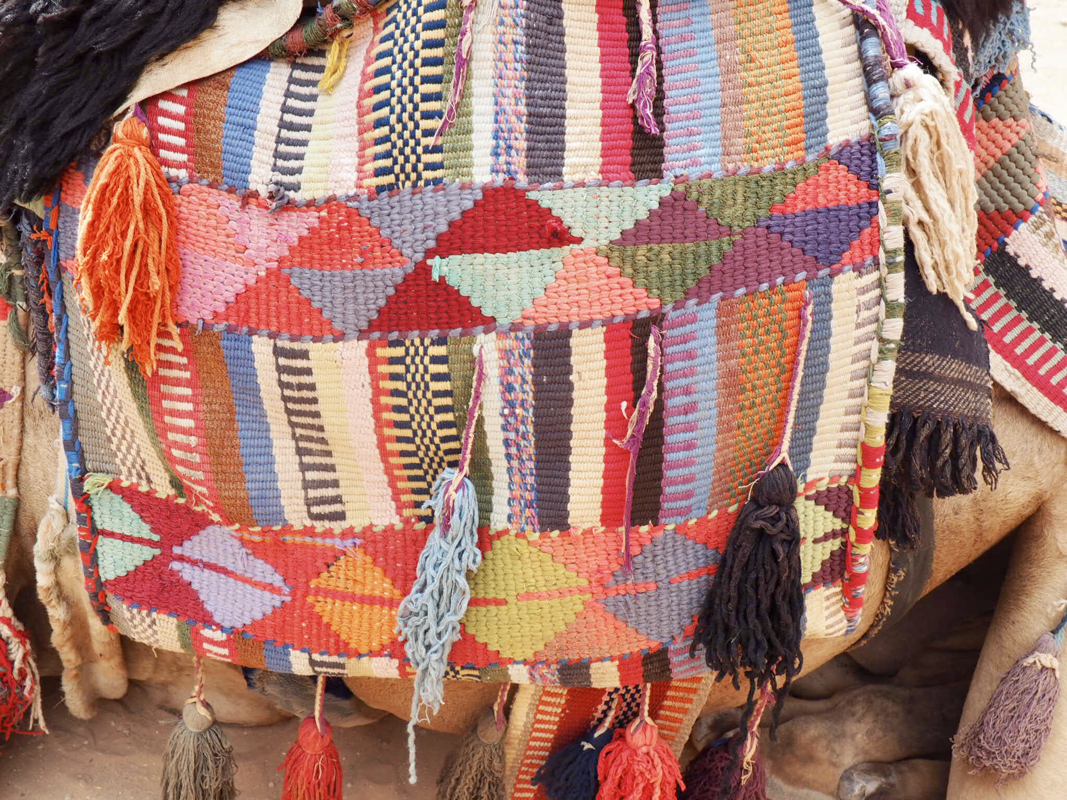
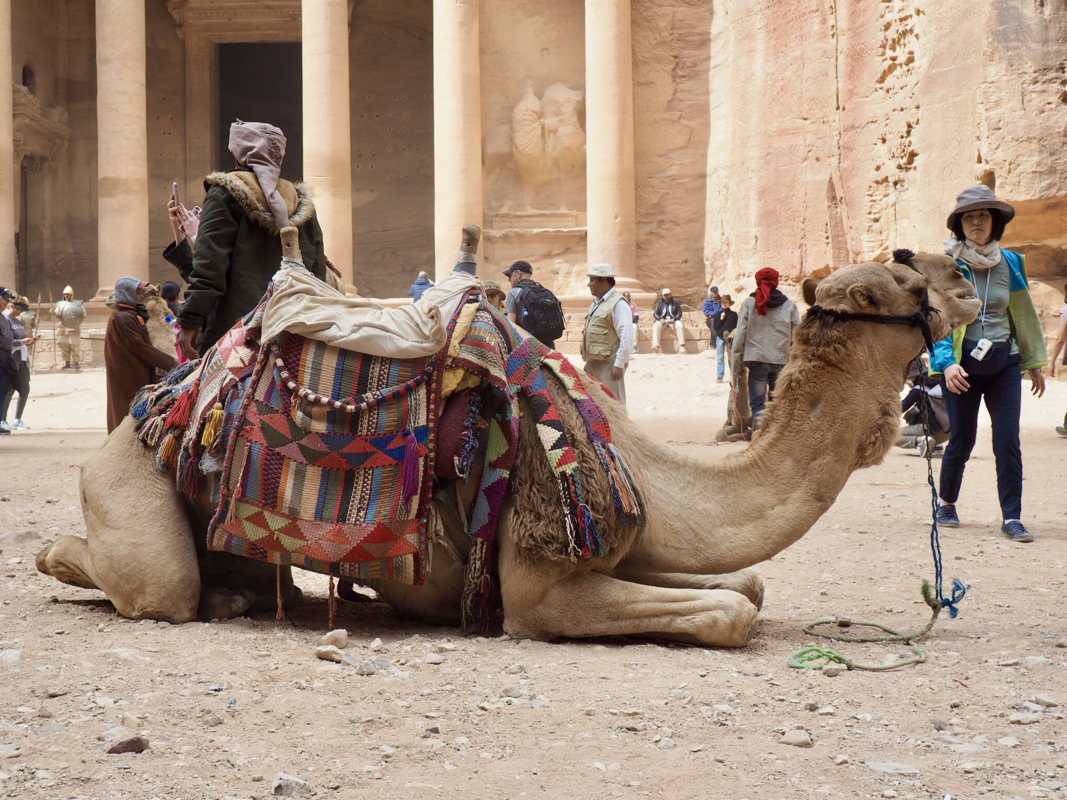
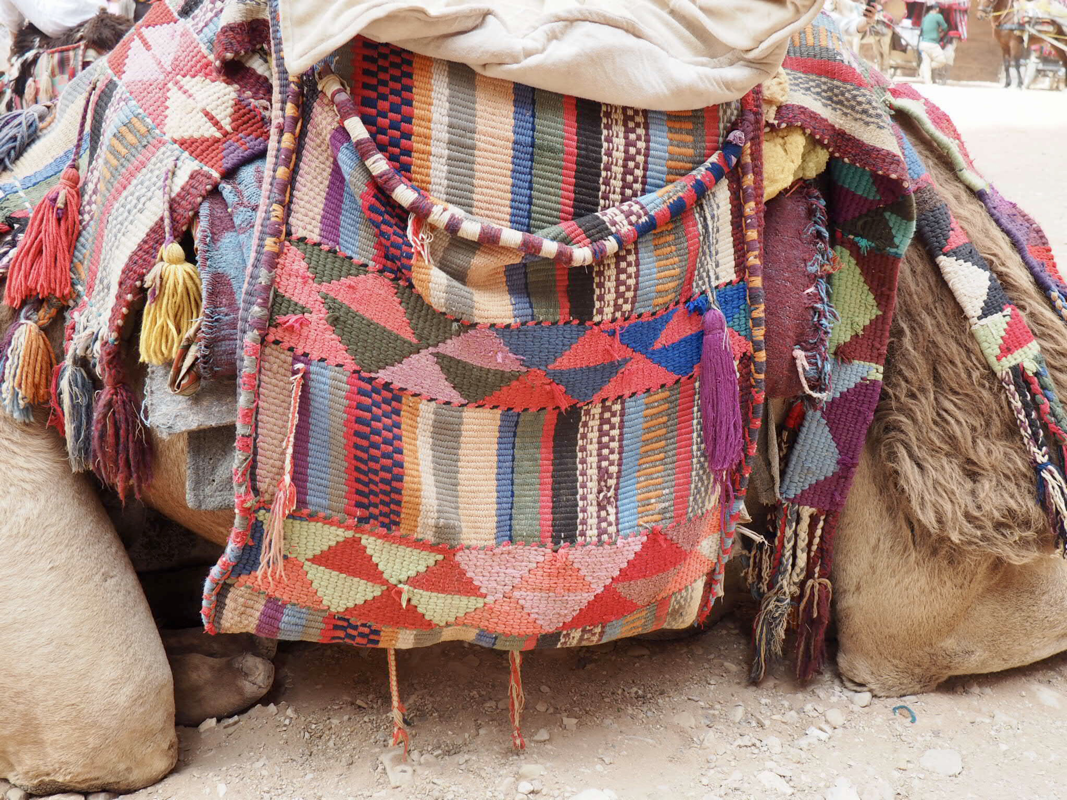
but that aside, these ones had beautifully woven saddles (and were very well behaved!)
Picture
You enter Petra through The Siq, which in itself is an amazing walk and then you start to see glimpses of why you’ve come:
Picture
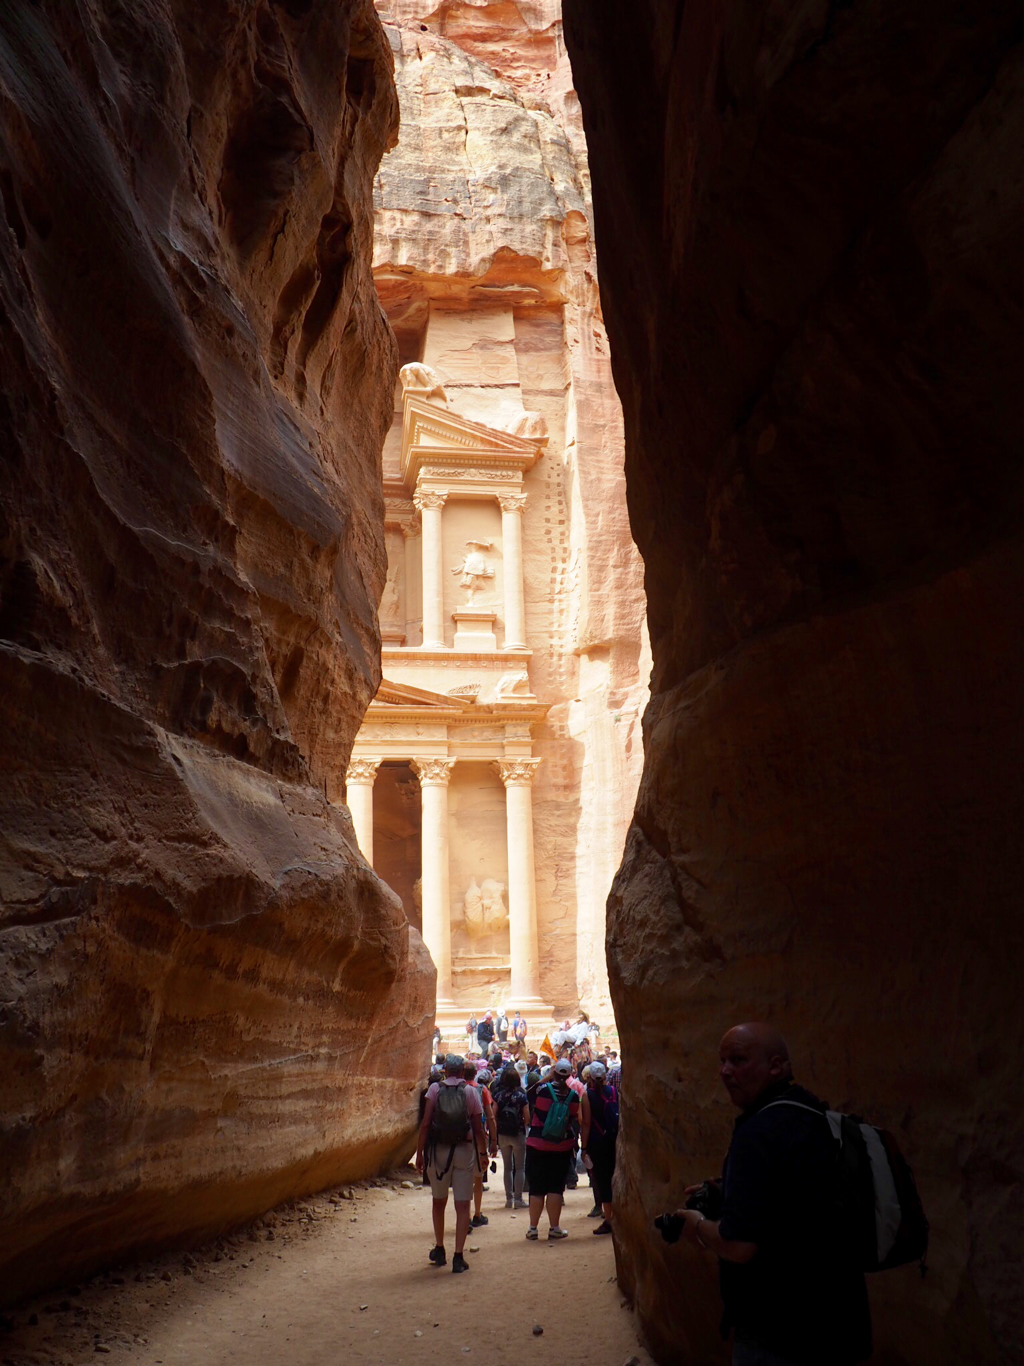
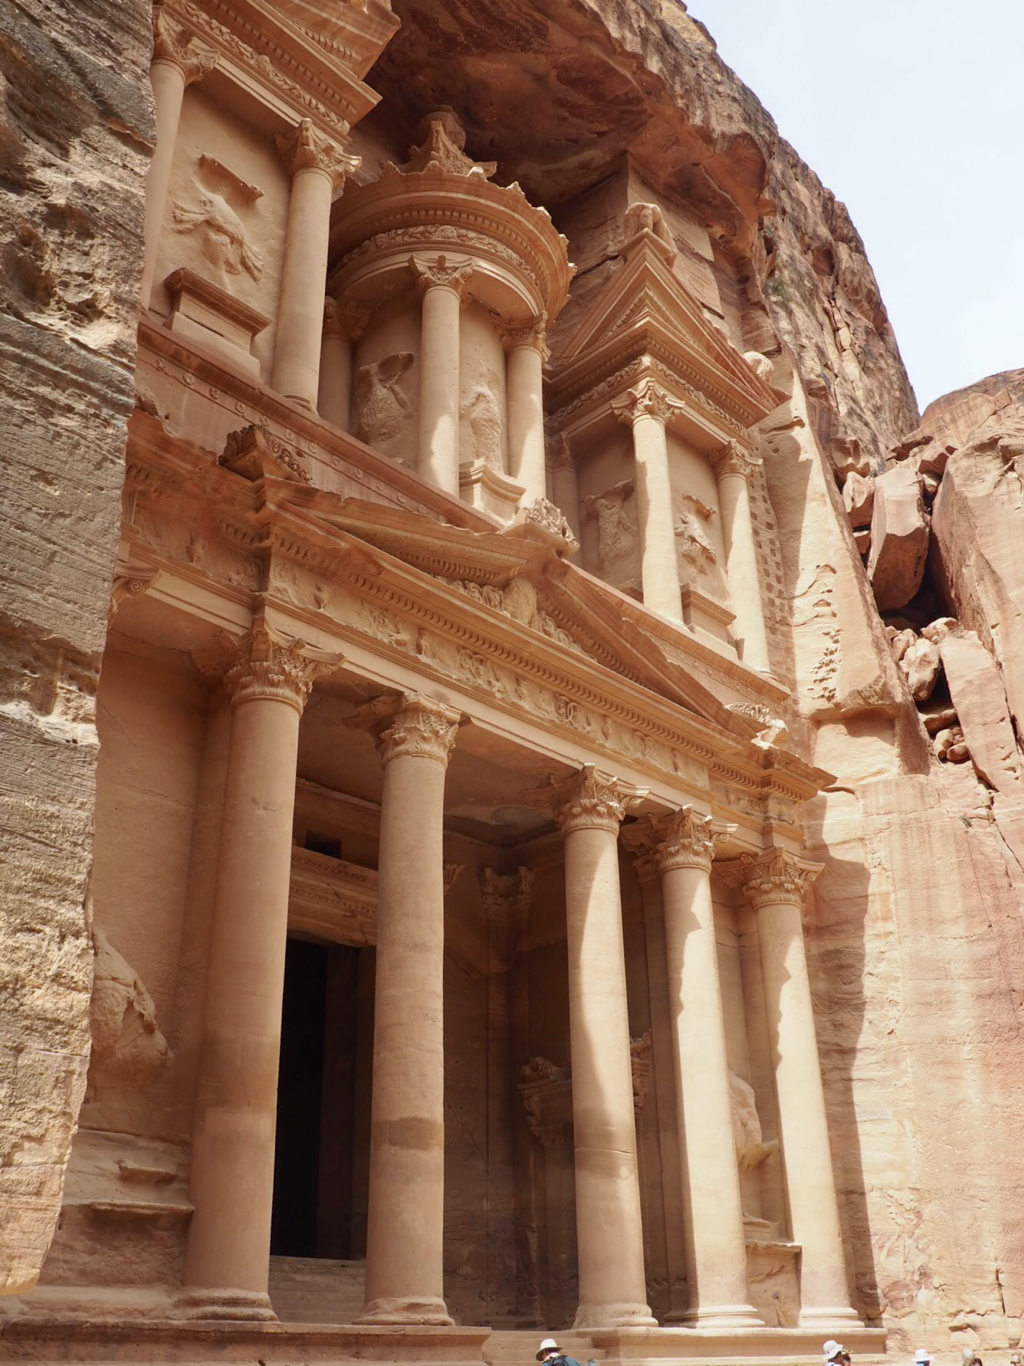
The Treasury, this is the view and why you travel to Petra.
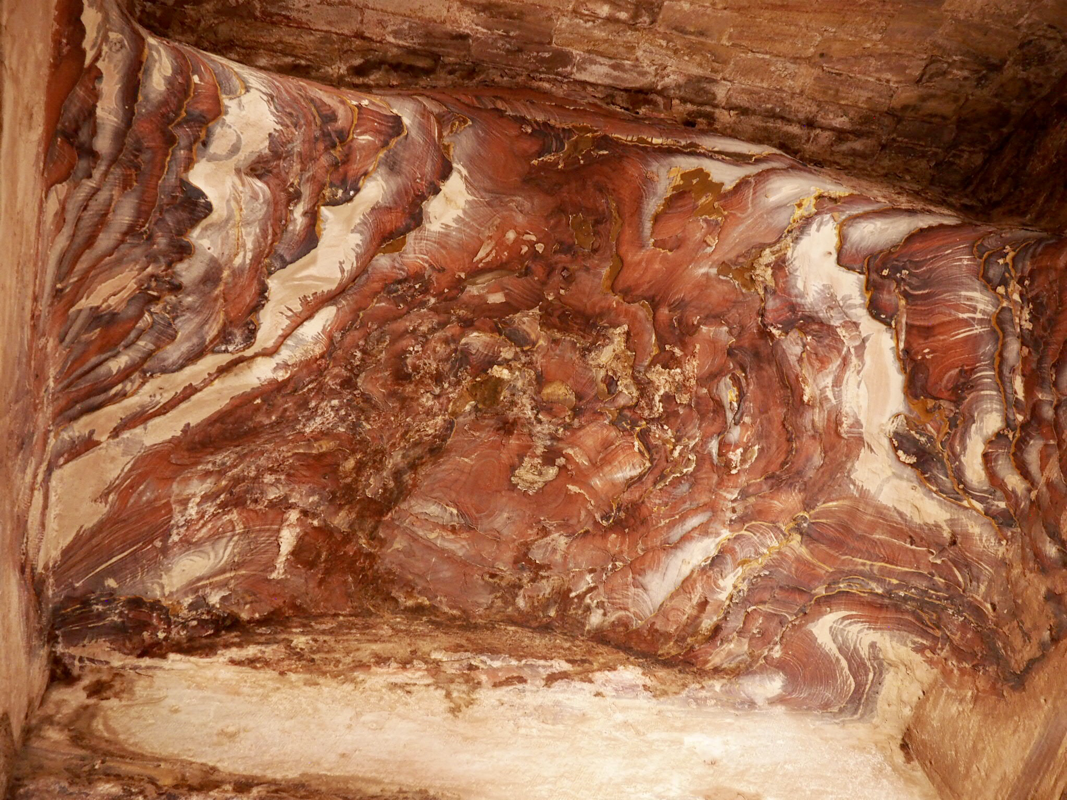
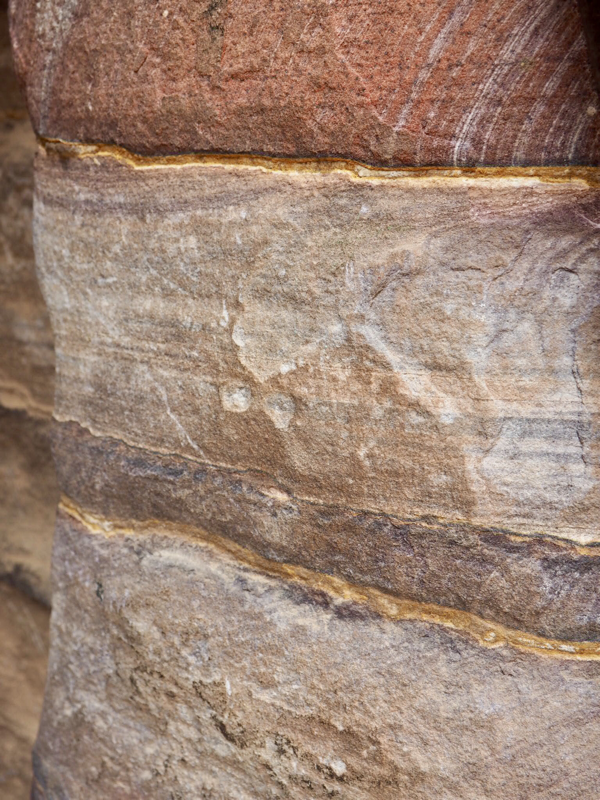
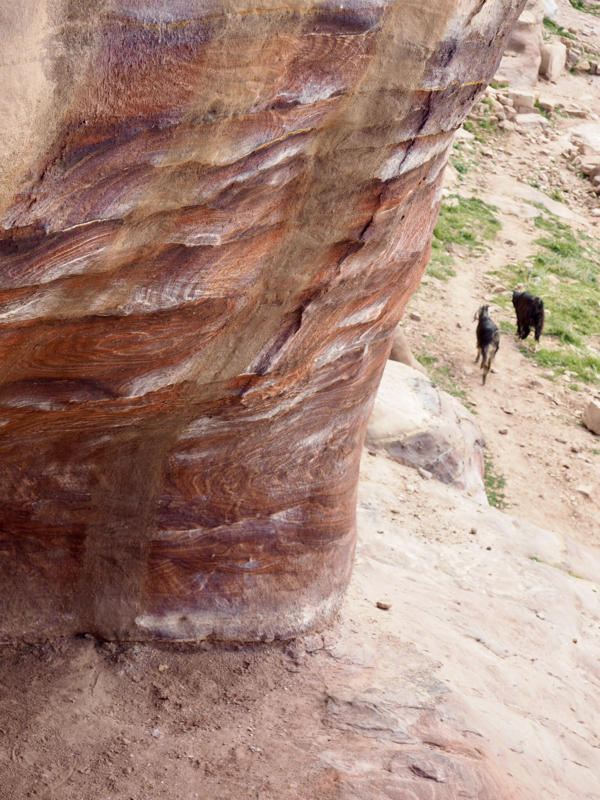
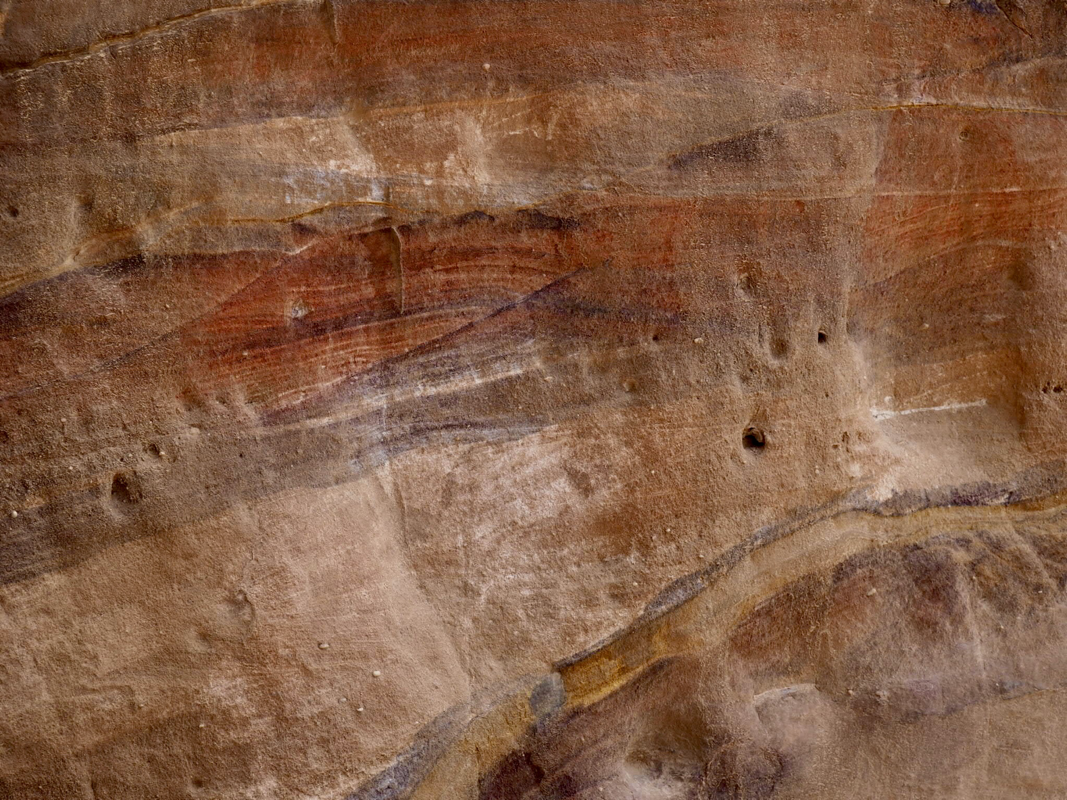
But it’s the rocks that keep you mesmerised
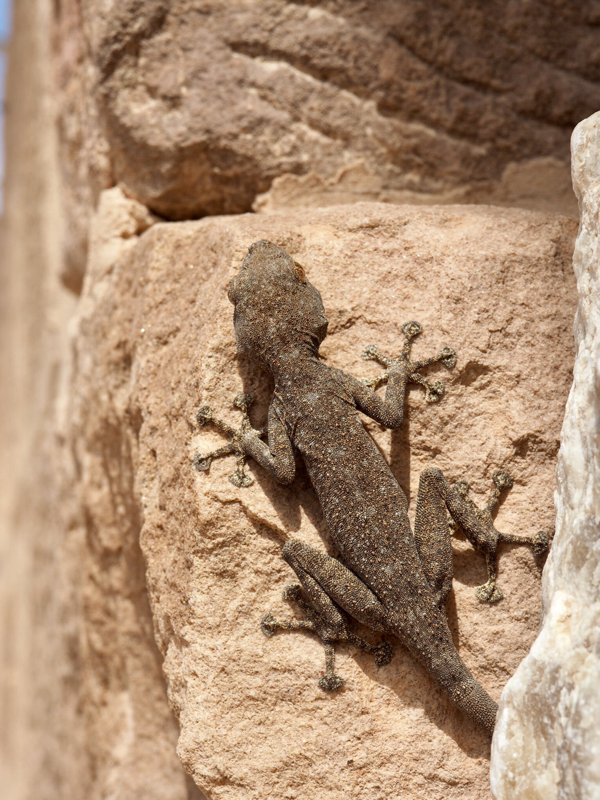
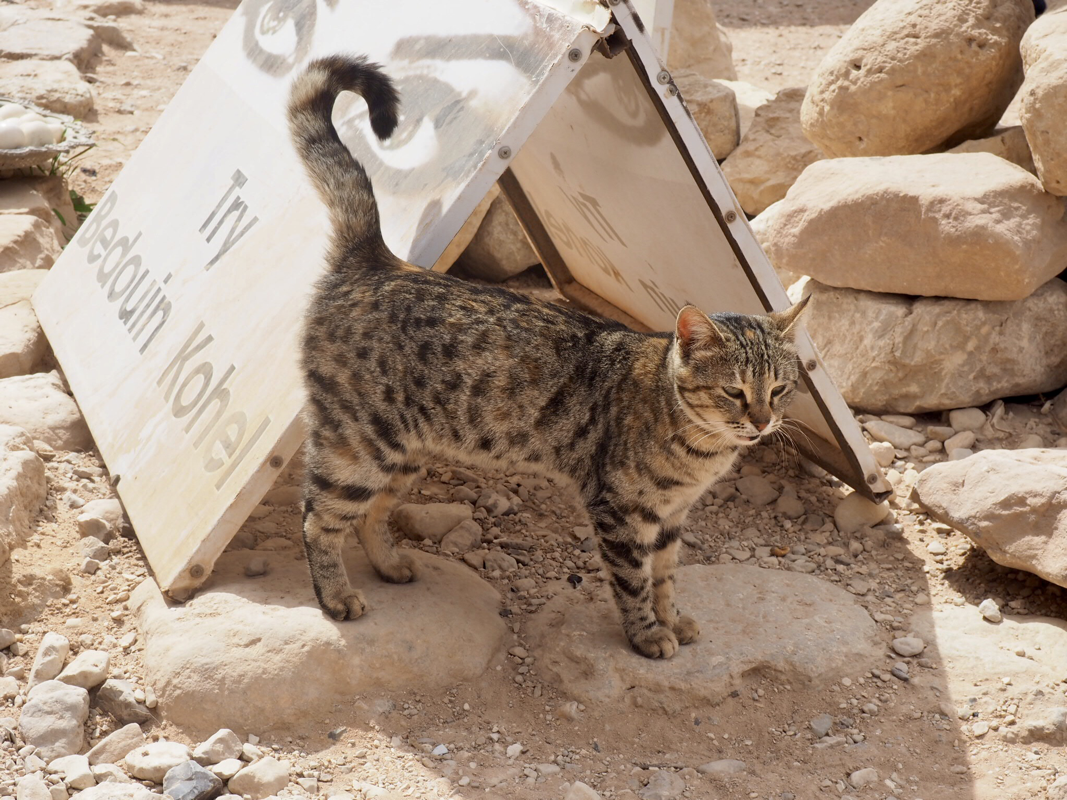
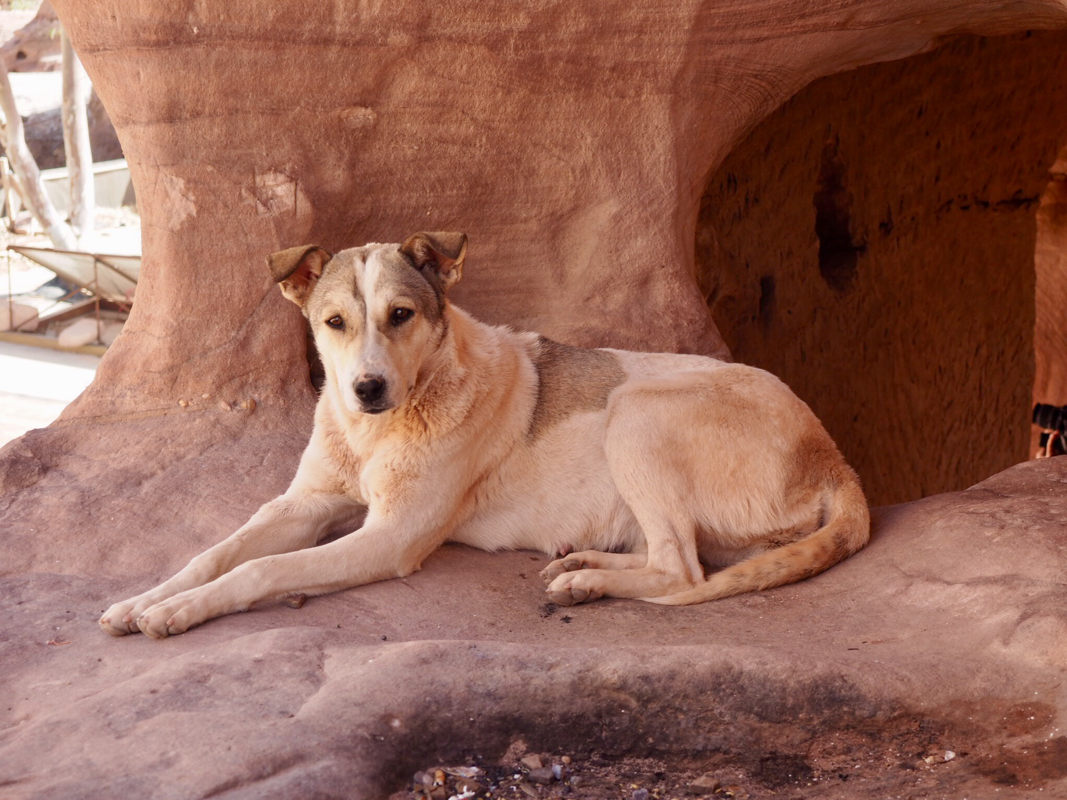
and the resident animals which give it life and character!
Picture
Fascinating by day
Picture
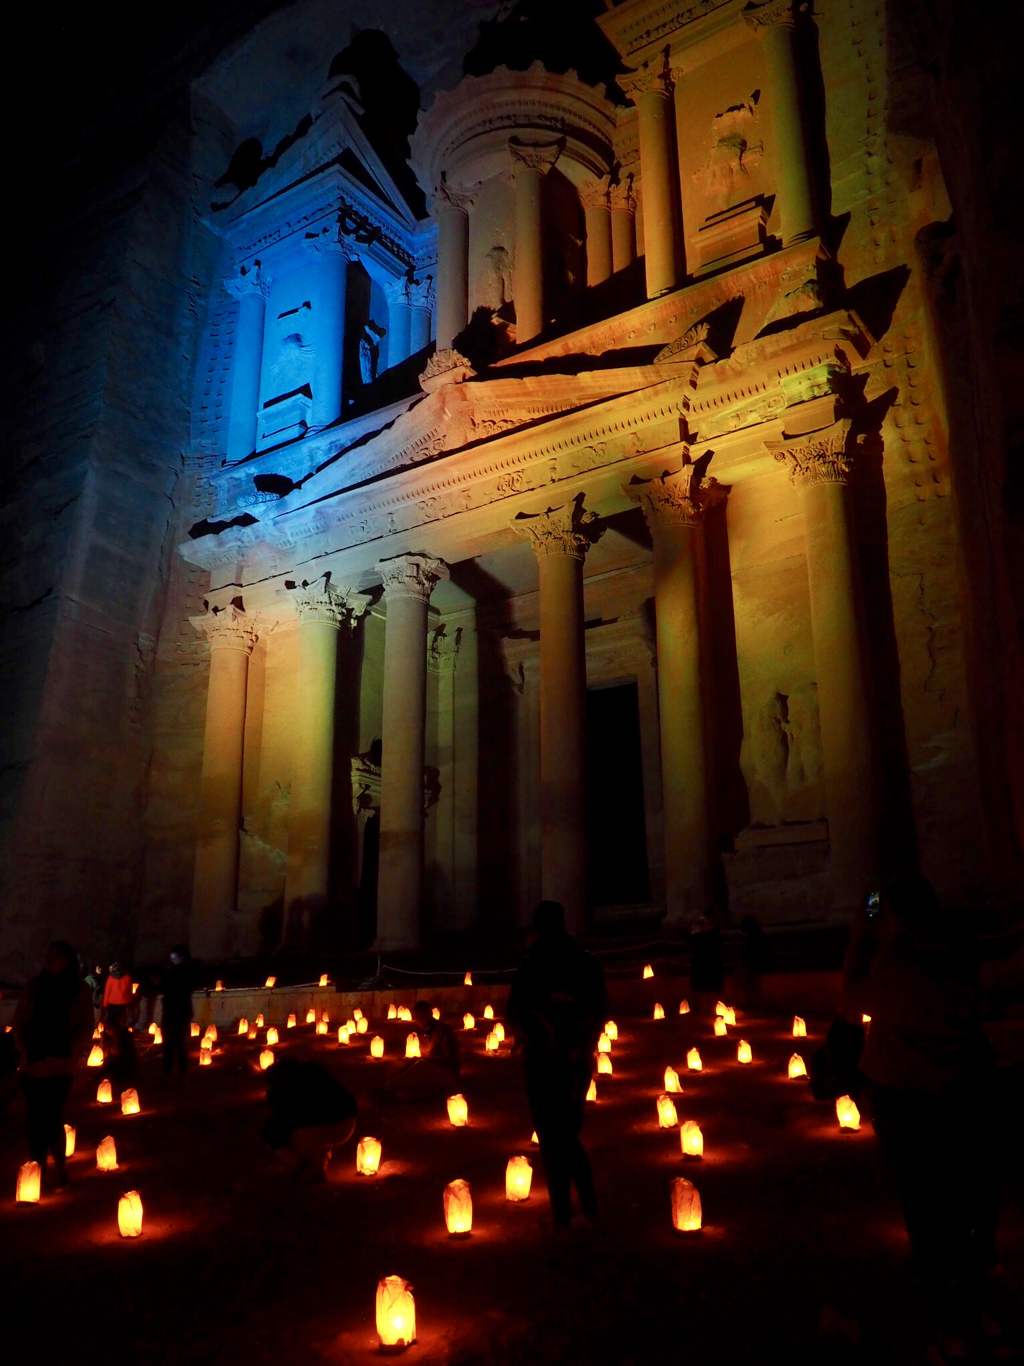
and quite magical by night. Once I’d overcome my lack of exclusivity, Petra was the most amazing place to visit and move away from the Siq and Treasury there are some amazing delights waiting for you.
Picture
No coffee was being served, but
Picture
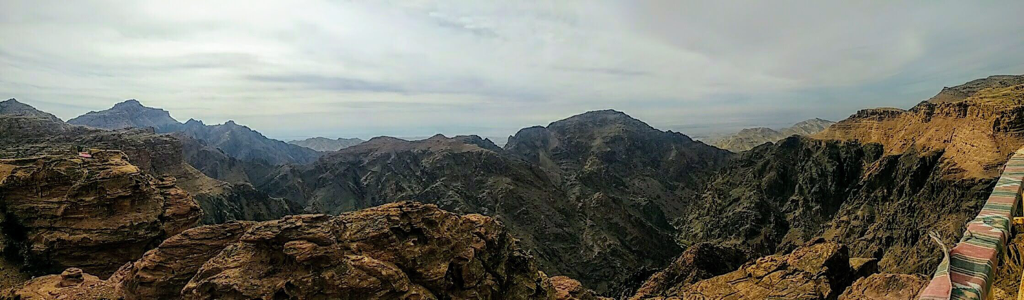
just look at the view, you feel as though you’re quite literally on top of the world.

It took my breath away.

In one week I managed to take over 1000 photographs (as well as cycle too!) so they’ll be sure to pop up in future blogs!

Wrap up warm for next time when it’s glaciers and frozen waterfalls....

Hazel & Terry

0 Comments

and there was cake: coconut macaroons

8/3/2019

1 Comment

 
It has been a very busy week in the studio as we welcomed back the inspirational textile artist Debbie Lyddon for a two day stitched collage workshop.  If you've ever been on one of our Textile Adventures you'll know that as well as providing most of the materials we like to feed you too!  Morning coffee with homemade biscuits is ready to welcome you as you arrive in the studio and  one of our favourite recipes is  chocolate macaroons.
Picture
Anything which has coconut in it is sure to be a winner with Terry and I, but what makes this recipe really great is that I can adapt it to suit both gluten free and lactose free diets.
Picture
When baking gluten free recipes I have recently been using this flour from Cloud 9, which can be substituted weight for weight for regular flour in recipes.  I buy mine from the Costco here in the UK, but I'm sure if you search online you will be able to find it or similar.
Picture
Picture
The recipe I use is one I have adapted slightly from Sarah Leahey-Benjamin's The New Baker in The Telegraph:

MAKES
26 to 30 cookies
INGREDIENTS
4 large egg whites (I use pasteurised dried egg whites )
250g (9oz) granulated sugar
1 tbsp mild honey
210g (7½oz) unsweetened desiccated coconut
4 tbsp flour (substitute with gluten free if requitred)
½ tsp vanilla extract
½ tsp salt
200g (7oz) dark chocolate (minimum 70 per cent cocoa solids)

METHOD
  1. In a large frying-pan mix together the egg whites, sugar, honey, coconut and flour with ½ tsp salt.
  2. Place the frying-pan over a medium heat. Stir slowly but constantly to dissolve the sugar. Keep an eye on the bottom of the pan – when the mixture starts to stick remove the pan from the heat. Transfer to a bowl and stir in the vanilla extract. At this point the mixture can be left chilled, in an airtight container, for up to a week.
  3. Preheat the oven to 180°C/350°F/gas mark 4. Line a baking-tray with baking-parchment.  Damp your hands with water. Scoop a spoon of the coconut mixture into your hands and form into a ball.
  4. Place the macaroon on the baking-parchment and flatten with your hand slightly.
  5. Bake for 18 to 20 minutes. The macaroons should take on a fairly uniform golden colour all around. Remove from the oven and allow to cool for a couple of minutes on the tray before lifting them on to a wire rack to cool completely.
  6. Gently melt the chocolate in the microwave or over a bowl of warm water, then dip in the base of each macaroon, place on baking parchment and leave to set.
To make the macaroons suitable for a lactose free diet simply miss off the chocolate or use a dairy free chocolate such as the type made by Double Spiral Chocolate.

Perfect to accompany any freshly brewed pot of tea or coffee!

Hazel & Terry
1 Comment

Creative play: Monoprinting

1/3/2019

0 Comments

 
Before you get excited and think that this is a definitive tutorial on how to monoprint - it isn't!  More of a peek into my tentative journey in the technique.  
Picture
Picture
We've acquired* several large thick Perspex sheets and think that they'd be great for Monoprinting, but the only way to be sure would be to actually have a go.  We've dabbled with Monoprinting on and off over the years, mainly using old laminated sheets or small pieces of thin Perspex, and used a safe wash block printing ink form Seawhite,  this is a  great product and is easy to use - but isn't fast once dry, so you can't add further wet processes.
Picture
Picture
When we moved studio earlier this year one of the (many...) things we found were several tubes of  Caligo safe wash inks from Cranfield. Bought and forgotten (and how many of you have done this too?) However, having recently read an article on the Caligo inks it appears that these inks will become permanent on fabric and paper after a curing process; it was high time I tried them out.
Picture
Picture
How much ink to put onto the plate is difficult to gauge and only by actually having a go can you really get the feel.  Inking up is also really tricky on such huge plates, it needs to be spread much thinner than you'd imagine, as I found out with my first (paper) tries.  In fact I actually only inked the plate once the whole day (yes - that's how much ink I'd put on!)  and between prints just rerolled with the brayer to smooth the surface again.
Picture
Picture
My first attempts were very disappointing (but at least they didn't stick to the plate). To begin with I was using a very light pure greaseproof paper ('deli' paper) and it was only once I was happy that the plate was behaving did I moved on to fabric.
Picture
I used a cotton sateen fabric, which I 'floated' over the surface, letting it drop very gently onto the inked plate.  I nearly stopped breathing at this point, but as the fabric settled I could see that I had finally achieved the correct level of ink on the plate - the fabric settled but did not absorb ink.   As you can see,  this meant I achieved really clear marks and lines: I'm very pleased, and relieved!
Picture
In today's world instant gratification seems to be taken for granted - from ready made and fast food, the pinging of texts or emails on your phone to the  ever increasing ways to access online data.  We don't even need to stand in line anymore because more and more we buy on-line. 

But in the creative world it's good to travel a slower road, taking the time to play and experiment, to explore the 'what if's', celebrate our successes - and mistakes, because after all a mistake is just a creative opportunity! Often students roll their eyes at us when we say ' I don't know, have you tried making a sample?'  Terry and I are both firm believers in 'doing', having a go, trying things out.  It's only through the act of doing  will you ever find out what will work, and what won't, which techniques are suitable and which aren't.  Time spend in practical exploration is never time wasted - besides which, look at all the fun and joy you will have on the way.   

Meanwhile I have to wait patiently for the fabric pieces to cure and then I can start to add colour before layering up and stitching.  I'm so excited, and not a little impatient, to get started....

Hazel & Terry

P.S. You didn't think I'd be throwing away the over inked first attempts did you??  They've been put to one side to dry with the rest of my trials and will be added to the stash of creative papers ready for including into sketchbooks some day!
* as with many things we have in the InStitches Studio these had had a previous life and were heading off to the scrap yard!
0 Comments

Christian Dior: Designer of dreams

22/2/2019

1 Comment

 
I've waited and waited for this exhibition to come to the UK after seeing it featured on a friend's Instagram feed last year (she'd seen it in Paris) and this Monday was an ideal opportunity for a mother-and-daughter day out!  Unfortunately, I'd forgotten it was half term but even  a 50 minute wait in the members queue did nothing to dampen our enthusiasm and eventual enjoyment.
Picture
The V&A exhibition spans from 1947 to the present day, and traces the history and impact of one of the 20th century's most influential couturiers, exploring the enduring influence of the fashion house, and Dior’s relationship with Britain.

And because it was a V&A exhibition you were allowed to photograph and encouraged to share....so here's some of my favourites: enjoy!
Picture
Picture
Picture
Picture
Picture
Picture
Picture
Some of the designs from Dior who came after the untimely death of Christian had a more challenging focus.  I wonder what he would have thought?  Colourful yes, but wearable and flattering? Not always!
One of my favourite rooms (and there are many in this exhibition) was the one based on the atelier.  The simplicity and clean line of the calico toile was stunning.
Picture
Picture
Dior designed the whole look and an important aspect was millinery . 
Picture
Could this be the perfect hat for me I wonder?
The penultimate room is one for you to linger in.  Walk round, admire the dresses and then sit and enjoy the light show.  A magical end to a truly stunning, and unmissable, exhibition.
Picture
The V&A exhibition runs until 14th July but, except for a very limited number of daily tickets, is sold out.  However I am sure that, due to the popularity of the exhibition, its run will be extended.  ​More information can be found over on the V&A website.  And of course, if you are a member you can visit the exhibition free at anytime - if you don't mind standing in the queue!

​ Hazel & Terry (who's a bit miffed at not going...)
1 Comment

Finding text

15/2/2019

0 Comments

 
We both love words and like to use them in our creative work, both as text to be read and as text for texture.  When we start planning a stitched textile we take our inspiration from many areas, recording what we find in drawings, in colour and in words.  We play with the words, sometimes isolating particular words and phrases and other times so that, although they look like words, the whole narrative can't always be seen or understood. 

It is easy for the viewer to understand the purpose of text that can be read, but having text that can't be read can baffle some; so why do we do it?

As humans we can recognise the written word, whether we can actually understand it or not, and so it draws us in.  Text piques our interest - we want to try and make sense of it; you could say it's like solving a puzzle.  That's why, when you are travelling, foreign scripts are so fascinating.

Picture
Indistinguishable text in our stitched textiles can be a way of adding a hidden meaning, adding to the narrative in a personal way,
Picture
Picture

and then sometimes we just want to use text for texture or because of the elegance shape of the letters....

Join us again to see how we use text in our own work,

Hazel & Terry
0 Comments

Bringing colour to life: yellow

8/2/2019

0 Comments

 
It's a very grey, wet day here at the studio, so what better antidote is there than an injection of bright colour? 
Indian yellow, Persian yellow, lemon, golden, saffron, sepia: yellow is one of the strongest colours but I don't think there is another colour which has such a split personality.
Picture
The colour of life, with yellow aconites and daffodils pushing through the winter foliage and last week snow to add a much needed injection of colour in early spring, through
to a riot of colour in the summer borders. But don't forget to heed nature's warning combination of yellow and black: the wasp and bee sting isn't as welcome as a bunch of glorious blooms!
Yellow is a colour which keeps on giving all through the year,
adding vibrancy to our plate as well as our vases.
I couldn't resist adding these warning signs taken as I plodded up (not being mad enough to cycle) the switchback road on the Nilgiri Hills on route to Ooty, India.
Picture
However our studio sign is far less dramatic!
Yellow isn't a colour either of us use very much (or at all , says Terry) and we have to consciously make an effort to dye fabric and thread to sell.  But, just as it was with the colour orange, I'm discovering that the golden, mustardy shades are becoming more appealing the older I become. 
In Asia yellow is a sacred colour but it is one of the least favourite colours in the West, being associated with cowardice and yellow cards in football!  And never to be forgotten are the yellow stars Jews were force to wear by the Nazis.

But where would we be without the helpful yellow sticky notes, a jar of mustard for our beef and a yellow cab is easy to spot if we need to go somewhere fast?
A colour to represent energy, joy, cheerful, optimism, sunshine, hope, spring, youth, action, imagination and happiness or greed, envy, treachery? 

What's your favourite colour?

Hazel & Terry
0 Comments

spring cleaning...

1/2/2019

0 Comments

 
Although it's cold here the sky is clear, the sun is out and there's a beautiful heavy frost; a perfect day for a winter walk.  We're very lucky as the InStitches Studio is  in the countryside and we only need to walk out of the front door, turn left and stroll down the lane.
Picture
It was such a joy to reach the ford and spy lots and lots of perky snowdrops showing in the winter undergrowth.  As we walked back up the drive we could see the daffodils buds  beginning to swell and underneath the bluebells  beginning to push through.  Each season brings it's own delights, but I'm hoping spring won't be too long coming.
Picture
Last year we'd been given a couple of older sewing machines which we thought would be useful for studio use, but with everything that's been happening recently we've not been able to sort them out.  Until yesterday: time to give them a spring clean and see if they worked. 
Picture
Hmmmm...looks like the previous owner didn't clean out this machine very often!  
Picture
It was weirdly satisfying, however, poking about in the (unplugged!) sewing machine collecting all the, broken threads and years of built up dust and fluff.  A quick lubrication and the machine is running smoothly now.

How often do you clean out your machine?  I've a little rule: every change of bobbin means a quick fettle around with the cleaning brush,  and every now and then I take the vacuum cleaner nozzle and give the whole machine a 'deep' clean.  Remember, a machine that's full of dust and fluff isn't likely to run well and could have tension issue. 

A clean machine is a happy machine and a happy machine means a contented sewer!

Hazel & Terry
​
0 Comments

...and breathe!

25/1/2019

0 Comments

 
This quilt was made by one of our students, who first started quilting with us and then put in many hours of practice! Free motion quilting is a skill, it can be taught and therefore learned: no one is born a free motion quilter!  ​
Picture
Our free motion quilting (FMQ) course is one of our most popular and this week we started off not one, but two classes.  Whilst we're having a welcome coffee we introduce the course structure and give lots of information about needles, threads and various ways on how to deal with T-issues*
Picture
To begin with we always first draw out the pattern in a book, on the white board or even on the iPad  because it gives a chance to see where you're going, improves hand-eye coordination and promotes muscle memory, as well as giving you problem solving thinking time - how are/ where are you going to start and stop the pattern etc 
Picture
Then it's time to start stitching.  A simple 'head & shoulders' pattern is a great pattern to start with as you have to move up and  down as well as left to right and then as you move down to the row below, right to left.  Start stitching at your default size to begin with and then try going larger and smaller in scale.

Even after all the years we've been stitching, if we haven't free motion quilted for a while we still do this as our warm-up exercise.  It also is a great way to check that your machine is running smoothly and that there are no tension issues.
Picture
Wear quilting gloves also helpful when you FMQ as they'll give you extra grip when manoeuvring the quilt sandwich under the needle.  

You may be puzzled by the blog title, but throughout the first day we find students have a tendency to hold their breath as they sew, so we like to remind them: pop your tongue in and....breathe!

If you would like to learn how to  free motion quilt or to improve your technique why not subscribe to our newsletter as we'll shortly be releasing the dates of our next courses?
​
Hazel & Terry

* tension!
0 Comments

#womaninanapron

18/1/2019

1 Comment

 
Happy New Year! A bit late I know, but as it's still January so I think I'm still in time! You'd be forgiven for being a bit confused over the title for this week's blog but if you follow us on either Instagram or Facebook you'll know that we've had entered 2019 with quite a bang using this hashtag!

For the last 18 months we've watched as Chris, our landlord, built a new studio especially for us. Planned originally as a warehouse he adapted the plans in the building schedule to transform it into a bespoke studio just for InStitches.

No, we can't quite believe it either!
Picture
It's a bit of a dull day so perhaps not the most inspiring of images I know, but it'll give you an idea!  The outside still needs to be landscaped and the carpark levelled, but we're in and open for business: Phew!
It was a close run thing aiming to move in over the Festive period, especially as there was still so much to do... But you know what they say: If you want a job done, just ask a busy woman. So, as you can see from the photographs, we tied on the aprons and got stuck in!

Grouting, undercoating, topcoat painting, climbing up tall ladders: we tackled all that we could. And before any of you make comments - I was there, working just as hard (that’s me up the very tall ladder ) but someone had to take the photographs!
Cups of tea and sweet treats kept us all motivated and working...
and gradually everything began to fall into place until
everything from the old studio was moved in!  There was still furniture to put together, new print tables to build and the painting to finish,
but eventually the tables were up and despite the ever-growing pile on the table 
everything made it onto shelves, into cupboards or, when we were desperate, up into our loft.  Our ex-ward trolley is even being used for what we'd always intended!​
Picture
Time to close the door and go home, at the relatively early time of 10.30 pm! ​
The next day we were open to welcome our students. With 12 large adjustable print benches, huge windows to let in plenty of light, a dedicated 'wet' area and space to sit and eat lunch (this week we are hosting a guest tutor workshop ) and level access parking to say we're feel pleased would be the understatement of the century!  I expect we'll be wandering around with silly grins on our face for quite some time to come...

Come and see us soon, you'll be sure of a warm and creative welcome!

Hazel & Terry


1 Comment

and there was cake: Chocolate chip biscuits (gluten free)

17/1/2019

0 Comments

 
Guest tutor days come complete with homemade biscuits and cake I'm always on the look out for great tasting gluten free biscuit recipes. This week I tried out Meaningful Eats' chocolate chip cookies recipe and it was a winner with all students, gluten free and otherwise, so I thought I'd share the recipe with you.
Picture
Ingredients
  • 1 stick butter (1/2 cup) (4oz/ 110g)
  • 1 tablespoon milk (or almond milk)
  • 3/4 cup brown sugar
  • 1/4 cup white sugar
  • 1 egg
  • 2 teaspoons vanilla
  • 1 1/3 cups (7.5 ounces) gluten-free all-purpose flour (recipe recommends for best results  to use one that contains xanthan gum)
  • 1/4 cup (1 ounce) almond flour ( I just used ground almonds)
  • 1 teaspoon bicarbonate of soda
  • 1/2 teaspoon salt
  • 1 cup chocolate chips
  • Sea salt for sprinkling (optional)

Instructions:
In a medium bowl, whisk together the gluten-free flour, almond flour, baking soda and salt until evenly combined. Set aside.

Melt butter in a saucepan over medium heat. Once the butter is melted start to whisk constantly. First the butter will begin to foam, then after a couple of minutes it will begin to brown on the bottom of the saucepan. Turn off the heat as soon as the solids turn brown and the butter gives off a nutty aroma. Pour into a glass mixing bowl to prevent burning.

Add the milk, brown sugar and white sugar. Whisk to combine. Add the egg and vanilla and whisk until smooth and creamy.

Using a rubber spatula, mix in the dry ingredients until well combined. Stir in the chocolate chips.

Cover the bowl and let sit for 30 minutes.

Preheat the oven to 180C. Scoop the cookie dough (about 1 dessert spoons of dough per cookie) and place a few inches apart on the baking sheets. Bake for 10-12 minutes, until golden and the centre is set.

Let cool 5 minutes then transfer to a cooling rack.

Visit  Meaningful Eats website first as there's lots of tips and plenty of other gluten free recipes.

Enjoy!

Hazel & Terry

0 Comments
<<Previous
Forward>>

    Welcome to our blog! Here you'll find out what's been going on, plus plenty of ideas and inspiration and the odd cake recipe!

    Check back often to see what we're up to - it's great to have you along

    Hazel & Terry
    Picture

    Enter your email address:

    Delivered by FeedBurner

    RSS Feed

    Categories

    All
    #10minutedrawingproject
    And There Was Cake!
    Artists To Inspire You
    Blog Changeover
    Bringing Colour To Life
    Colour
    Craft Ptoject
    Creative Play
    Creative Warm Ups
    Creative Warm-ups
    Festival Of Quilts
    Finding Inspiration
    How To...
    Inspired By Cloth
    #institchescreative2020
    Line
    Places To Inspire You
    Quilt Shows
    Text
    Texture
    The Story Behind The Quilt
    Tools Of The Trade

    InStitches travelblog
    InStitches textiles travel blog
    Picture
    Picture

    Archives

    June 2020
    May 2020
    April 2020
    March 2020
    February 2020
    April 2019
    March 2019
    February 2019
    January 2019
    December 2018
    November 2018
    October 2018
    September 2018
    August 2018
    July 2018
    June 2018
    May 2018
    April 2018
    March 2018
    February 2018
    January 2018
    December 2017
    April 2016
    March 2016
    October 2015
    September 2015
    August 2015
    July 2015
    June 2015
    May 2015
    April 2015
    March 2015
    February 2015
    January 2015
    December 2014
    November 2014
    October 2014
    September 2014
    August 2014
    July 2014
    June 2014
    May 2014
    April 2014
    March 2014
    January 2014
    November 2013
    October 2013

    Visit InStitches's profile on Pinterest.
InStitches: exciting courses for people who love textiles, quilting, design, stitching and sketchbooks

Connect with us

follow us on Facebook
read our blog
Instagram inspiration
Pinterest pinnings
newsletter signup
follow us on Facebook
read our blog
Instagram inspiration
Pinterest pinnings
newsletter signup

Courses and workshops

Courses and workshops at a glance
Short courses and workshops
Longer courses
Guest tutors 2022
​Online workshops
​Studio days

InStitches

About
How to find us

Support

Contact
​
The small print
Privacy policy

Our address

Sunfield Studio,
Unit 12, Sunfield Business Park
New Mill Road
Finchampstead
Wokingham
RG40 4QT
We support
Just a Card logo
Copyright © InStitches 2010-2022
All rights reserved.